I'm sure with this being new blog, I don't have people checking back that often, and the main source of traffic is from friends when I let them know I've made a new post, or people doing a general google search for something cooking and click on around the 1054 link, which is this blog.
I've been trying to post once on the weekend (hopefully will become routinely Sundays) and then again on Tuesday or Wednesday depending on how my schedule goes. Even with these lack guidelines I've set for myself, I've already failed, due to a myriad of commitments I had made with friends and family weeks in advance. C'est le vie I guess.
I will do my best to give a detailed post on Tuesday this weeks on a great base for puddings that I will hope you will enjoy. Until then, keep on experimenting!
The Canadian Cooking Chemist
Monday, 19 March 2012

Wednesday, 14 March 2012
Homemade Risotto
One recipe I have always wanted to learn is risotto. Whenever you go to a fancier Italian restaurant, you'll almost always see some sort of risotto on the menu. To add to this, the risotto is usually at a higher price than many of the menu items and is touted as one of the more sophisticated items on the menu. If you ever watch the show Hell's Kitchen with Gordon Ramsay, he's always yelling at them "don't f-up the risotto! Come on you donkey!" So, about a year ago, I decided to look up recipes and have my hand at it.
After a year of tweaking, I have to say I feel risotto isn't a hard dish to make, it's just time consuming. As a result, I think most people may be turned off of making risotto on a normal day since it takes time they just don't wish to take or, quite possibly, just don't have. However, as a treat for yourself and family or as a romantic dish for that special someone, I highly recommend it as a dish to try.

The recipe I'm providing today is a recipe specifically for a mushroom and bacon risotto; however, you can easily forgo the bacon and mushrooms and add in flavours of your choice. To add in your own flavours, just replace the steps I give with mushroom or bacon with your ingredients.
What food stuff you will need for the risotto:
~ 4 cups chicken broth (low sodium or not salt is best - this is about 1 store bought carton of broth at 900 mL)
2 tablespoons olive oil or butter
~1 pound mushrooms (a medley of different mushrooms works well)
4-5 green onions
1-1.25 cup Arborio rice (You cannot use traditional brown or white rice, it needs to be short grained or round rice such as Arborio, Vialone Nano, or Carnaroli, to cook properly)
1/2 cup dry white wine
2-3 cloves of garlic
1/3 cup of Parmesan cheese
1/6 of a cup of another cheese (I suggest a nice raw cow or goat cheese to give some more "earthiness")
Several strips of bacon (I like double smoked)
Salt for taste
Fresh ground pepper for taste
What "equipment" you will need for the risotto:
1 large sauce pan
2 frying pans
1 cutting board
1 knife for chopping
Table spoon measure
Spatula
Grater
Directions:
1) In a large frying pan, place a few strips of bacon and heat on a medium heat for 3-5 min.
2) After the bacon has cooked on the one side, flip the bacon and cook on the other side.
3) Remove any excess fat and repeat steps 1 and 2 until bacon is crispy, then place on paper towel to dry.
4) Remove as much excess bacon grease as you wish, but do not fully wash the pan. Reduce heat to medium/medium-low and add in the sliced mushrooms to the pan with some salt and pepper.
5) After a few minutes, the mushrooms will being to soften and change colour due to being cooked. After about 3-4 min, add approximately 1 tablespoon of olive oil or butter.
Note: Slow and steady will give a nice sauteed mushroom (approximately 5-10 min).
4) In the large sauce pan, place in all the chicken broth heat on a
medium-high heat. Add a little pepper and salt for taste. Do NOT add
to much since as you heat the broth some water will evaporate
concentrating the salt.
5) Chop up 1-2 cloves of garlic. To help and release the garlic flavour, I crush the garlic with the side of my knife first (see picture) and then chop up the garlic and add to the frying pan.
6) Chop up 4-5 green onions (white and green parts), and chop up the bacon and add to the pan.
7) Reduce heat in the frying pan to low and give a quick stir to all the ingredients.
8) To a second frying pan, add 1 tablespoon of olive oil or butter and turn to medium-high heat.
9) When hot, add in the rice and a splash of the hot broth, and stir thoroughly for about one minute to coat the rice with oil/butter and some broth.
10) After the rice is lightly coated with the butter or oil, quickly add in 1/2 cup of dry white wine and constantly and quickly keep stirring until all the wine is absorbed.
Chemist Note: Yes, absorb. Absorb means the substance it taken into the material; while adsorb would mean just sitting on the surface.
11) Once the wine has been fully absorbed, add about 1/2 cup of the chick broth to the rice and continue stirring until all the broth has been absorbed (just like with the wine).
12) Continue adding about 1/2 cup of broth at a time to the rice and allow to absorb while constantly stirring (this should take about 10 minutes to complete).
Note: after every addition of broth after the third 1/2 cup addition, test the rice to see if it's done. If the rice is al dente before you're done using the broth, simply stop adding. If you run out of broth before the rice is done cooking, just add some water instead, it should be chicken flavoured enough.
13) To the rice, add in the mushroom, bacon, onion garlic mixture and give a good stir.
14) Remove the rice from the heat and let sit while you grate ~ 1/3 cup of Parmesan cheese and chop 1/6 cup of cheese with a bite.
Note: I suggest an nice 5+ years aged cheddar or raw cow cheese to give a nice earthiness, complimenting the mushrooms.
14) Place the rice back on a medium heat and stir in the cheeses until melted, should only take 1-2 min maximum. If the cheese is having trouble melting, just place back on a medium heat for another minute to help the process.
15) Add salt and pepper to taste, if needed, and plate.
Note: If you have circular cookie cutters, put them on a plate and spoon in risotto. Allow to cool for about 1 min and remove cutter to give a circular shape (see first picture).
16) Top with fresh Parmesan, fresh ground pepper and extra green onion and serve.
Enjoy!
The Canadian Cooking Chemist
After a year of tweaking, I have to say I feel risotto isn't a hard dish to make, it's just time consuming. As a result, I think most people may be turned off of making risotto on a normal day since it takes time they just don't wish to take or, quite possibly, just don't have. However, as a treat for yourself and family or as a romantic dish for that special someone, I highly recommend it as a dish to try.

Mushroom and bacon risotto
The recipe I'm providing today is a recipe specifically for a mushroom and bacon risotto; however, you can easily forgo the bacon and mushrooms and add in flavours of your choice. To add in your own flavours, just replace the steps I give with mushroom or bacon with your ingredients.
What food stuff you will need for the risotto:
~ 4 cups chicken broth (low sodium or not salt is best - this is about 1 store bought carton of broth at 900 mL)
2 tablespoons olive oil or butter
~1 pound mushrooms (a medley of different mushrooms works well)
4-5 green onions
1-1.25 cup Arborio rice (You cannot use traditional brown or white rice, it needs to be short grained or round rice such as Arborio, Vialone Nano, or Carnaroli, to cook properly)
1/2 cup dry white wine
2-3 cloves of garlic
1/3 cup of Parmesan cheese
1/6 of a cup of another cheese (I suggest a nice raw cow or goat cheese to give some more "earthiness")
Several strips of bacon (I like double smoked)
Salt for taste
Fresh ground pepper for taste
What "equipment" you will need for the risotto:
1 large sauce pan
2 frying pans
1 cutting board
1 knife for chopping
Table spoon measure
Spatula
Grater
Directions:
1) In a large frying pan, place a few strips of bacon and heat on a medium heat for 3-5 min.
2) After the bacon has cooked on the one side, flip the bacon and cook on the other side.
3) Remove any excess fat and repeat steps 1 and 2 until bacon is crispy, then place on paper towel to dry.
4) Remove as much excess bacon grease as you wish, but do not fully wash the pan. Reduce heat to medium/medium-low and add in the sliced mushrooms to the pan with some salt and pepper.
 |
| Mushrooms with salt and pepper |
Note: Slow and steady will give a nice sauteed mushroom (approximately 5-10 min).
 |
| The mushrooms cooked |
 |
| The broth heating slowly on the stove |
 | |||||||||||||||||
| Left: Crushing a clove of garlic with the side of the knife; Right: The crushed garlic |
7) Reduce heat in the frying pan to low and give a quick stir to all the ingredients.
 |
| The mushroom, bacon, green onion and garlic |
9) When hot, add in the rice and a splash of the hot broth, and stir thoroughly for about one minute to coat the rice with oil/butter and some broth.
 |
| The rice with some oil and broth after stirring for about 1 min |
Chemist Note: Yes, absorb. Absorb means the substance it taken into the material; while adsorb would mean just sitting on the surface.
 |
| Left: Rice with wine added; Right: Rice after the wine has been mostly absorbed |
12) Continue adding about 1/2 cup of broth at a time to the rice and allow to absorb while constantly stirring (this should take about 10 minutes to complete).
Note: after every addition of broth after the third 1/2 cup addition, test the rice to see if it's done. If the rice is al dente before you're done using the broth, simply stop adding. If you run out of broth before the rice is done cooking, just add some water instead, it should be chicken flavoured enough.
13) To the rice, add in the mushroom, bacon, onion garlic mixture and give a good stir.
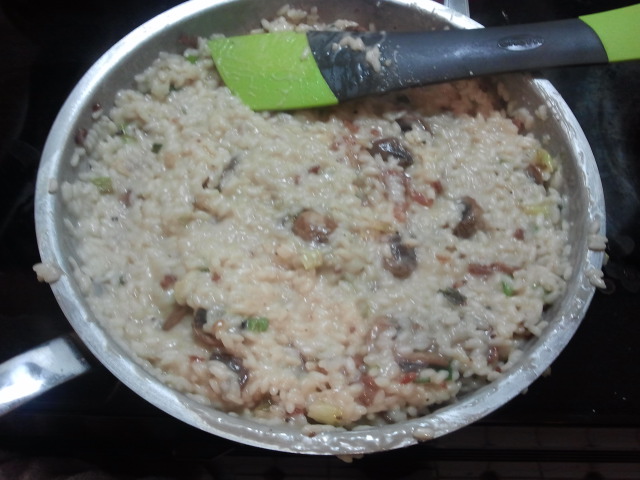 |
| The final mixture before addition of the cheese |
Note: I suggest an nice 5+ years aged cheddar or raw cow cheese to give a nice earthiness, complimenting the mushrooms.
 |
| Fresh grated Parmesan and cubed raw cow cheese |
15) Add salt and pepper to taste, if needed, and plate.
Note: If you have circular cookie cutters, put them on a plate and spoon in risotto. Allow to cool for about 1 min and remove cutter to give a circular shape (see first picture).
16) Top with fresh Parmesan, fresh ground pepper and extra green onion and serve.
Enjoy!
The Canadian Cooking Chemist
Sunday, 11 March 2012
The Only Waffle Recipe You Will Ever Need
It's the middle of March, which means it's time for most of us in North America to put our clocks forward one hour. It's around this time of year I think Saskatchewan is one of the smarter provinces, since they choose not to partake in daylight savings and carry on regardless.
The other morning I got up like I normally do on a Saturday and was having trouble of what to make for breakfast. I eventually got something together for Saturday, but I figured since I had to get up an hour early on Sunday, due to the stupid time change, I wanted to have something a little fancier to make the getting up earlier a bit more tolerable. To get inspiration, I walked down to market and saw all the succulent, fresh fruit that had arrived. What better vehicle to enjoy fresh fruit on than homemade waffles!
 Maple-almond waffles with fresh whipping cream and fresh berries
The waffle recipe I'm giving today is the best recipe I've been able to tweak for a waffle recipe. It is EXTREMELY forgiving when it comes to adding ingredients at tastes great using a normal waffle iron or a Belgian waffle iron. To the base recipe provided, you can add virtually any ingredient to give an infused flavor for savory or sweet waffles. These waffles can be extremely crispy with soft insides, or a made a little softer all-round.
What food stuff you will need for the waffles:
2 cups flour (sifted flour will give give a smoother texture waffle on the inside)
4 teaspoons baking powder
Pinch of salt
1.5 cups of milk
2 large eggs (whites and yolks separated, if possible)
Small amount of vegetable oil, butter or non-stick spray for waffle iron
Optional:
For all-round softer waffles: 5-6 tablespoons of vegetable oil
For sweet waffles: 1/4-1/3 cup sugar, any other spices to taste (i.e. nutmeg, cinnamon, vanilla, fruit, etc.)
For savory waffles: salt and pepper to taste, any flavors you'd like to add (i.e. oregano, rosemary, shredded cheese, bacon bits, etc.)
What "equipment" you will need for the waffles:
1 large bowl
1 medium bowl
1 fork or whisk
1 spatula
Cup measure and teaspoon measure
Waffle Iron
Electric or hand mixer (if you're opting for using the separated egg technique, which I recommend)
Directions:
1) Heat up your waffle iron so it's preheating to full heat.
2) Measure 2 cups of all purpose flour in a large bowl (if possible sift the flour; however, it's not mandatory to do so. Just realize you may have a few more lumps in your batter, making it a little less smooth and having a bit rougher texture)
3) Add in 4 teaspoons of baking powder and a pinch of salt to the mix.
4) Mix the dry ingredients thoroughly to give a homogenous mixture.
5) Add in 1.5 cups of milk and mix until the mixture is smooth throughout.
6) If you're going to add flavors to your waffles, add the ingredients in now and mix.
Some of my favorites are:
A) Maple-almond: 1-2 teaspoons almond extract, 1/4 cup sliced almonds, 3-4 tablespoons maple syrup, 1/4 cup sugar (instead of almond abstract you can use a shot of amaretto instead)
B) Apple-cinnamon: 1/3 cup unsweetened apple sauce or finely chopped apple, 1 teaspoon cinnamon, 1/4 cup sugar (eliminate if using sweetened apple sauce), 1 teaspoon vanilla
C) Banana chocolate chip: 1-2 mashed bananas, 1/4-1/3 cup chocolate chips, 1/4 cup sugar, 1-2 teaspoons vanilla
D) Oregano-bacon: 0.5-1 tablespoon of oregano, 3-4 strips of bacon cut into pieces, pepper to taste (after being cooked place a little shredded cheddar cheese on top).
7) If you want softer all-round waffles, add in 5-6 tablespoons of veggie oil now and mix in.
Choose only one of 8A or 8B to do:
8A) I highly recommend you separate your eggs (it will make it very crispy on the outside and soft on the inside like at a high end restaurant, using a normal waffle iron or a Belgian waffle maker).
Take the yolks mix them into the flour and milk mixture (there is no need to beat the eggs before you mix them in).
Take the egg whites and beat them with an electric or hand mixer until soft peaks form in a medium bowl.
Once the egg whites are ready, using a spatula carefully fold in the beaten egg whites into the batter mixture.
Note: Use long, slow swoops to mix in the egg white. Use the minimum amount of stirs/swoops to fully stir in the whites. It should look like the picture below.

8B) If you choose not to separate the eggs for time and convenience, beat the eggs in a medium bowl and add to the add your eggs whole now to the mix and
9) The waffle iron should be fully heated now. Quickly spray a light coating of veggie oil, non-stick spray or quickly wipe some butter on a piece of paper towel (careful not to get burner) on the iron.
Note: You only have to do this once, even if you're doing multiple batches. If you have a good non-stick iron or like crispier waffles in the first place, you won't even need to do this step.
10) Add the batter to the iron and let cook.
Note: A good indication of when the waffle will be done is when it stops steaming profusely. If you can open the iron and the waffle comes free from the iron easily, it's done. If you notice resistance when opening the lid, just let the waffle cook a little bit more. To add to this, if you like it crispier, leave it a little longer cooking.
If you chose to add the 5-6 more tablespoons of oil, you'll want to take it off sooner-rather than later, otherwise there was no point in adding the oil. Personally, I like to leave out the oil entirely, and I'm still incredibly happy with final product.
11) Top with syrup, berries, or whatever you desire and serve hot.
When it comes to sweetness, feel free to add as much or as little sugar as you wish. I find I usually don't add any sugar at all and let the sweetness come from the berries, syrup, whip cream or whatever else I add to the top of it. To cut back on the syrup consumption, I've added some sugar to the recipes, but never go more than 1/3 cup for a full batch. I like sweet items, but find that anymore than 1/3 cup becomes too much when adding any sweet toppings.
This is great recipe that can have spices and tastes be altered as deemed fit. So release your inner chemist and experiment in the kitchen!
Enjoy!
The Canadian Cooking Chemist
The other morning I got up like I normally do on a Saturday and was having trouble of what to make for breakfast. I eventually got something together for Saturday, but I figured since I had to get up an hour early on Sunday, due to the stupid time change, I wanted to have something a little fancier to make the getting up earlier a bit more tolerable. To get inspiration, I walked down to market and saw all the succulent, fresh fruit that had arrived. What better vehicle to enjoy fresh fruit on than homemade waffles!

The waffle recipe I'm giving today is the best recipe I've been able to tweak for a waffle recipe. It is EXTREMELY forgiving when it comes to adding ingredients at tastes great using a normal waffle iron or a Belgian waffle iron. To the base recipe provided, you can add virtually any ingredient to give an infused flavor for savory or sweet waffles. These waffles can be extremely crispy with soft insides, or a made a little softer all-round.
What food stuff you will need for the waffles:
2 cups flour (sifted flour will give give a smoother texture waffle on the inside)
4 teaspoons baking powder
Pinch of salt
1.5 cups of milk
2 large eggs (whites and yolks separated, if possible)
Small amount of vegetable oil, butter or non-stick spray for waffle iron
Optional:
For all-round softer waffles: 5-6 tablespoons of vegetable oil
For sweet waffles: 1/4-1/3 cup sugar, any other spices to taste (i.e. nutmeg, cinnamon, vanilla, fruit, etc.)
For savory waffles: salt and pepper to taste, any flavors you'd like to add (i.e. oregano, rosemary, shredded cheese, bacon bits, etc.)
What "equipment" you will need for the waffles:
1 large bowl
1 medium bowl
1 fork or whisk
1 spatula
Cup measure and teaspoon measure
Waffle Iron
Electric or hand mixer (if you're opting for using the separated egg technique, which I recommend)
Directions:
1) Heat up your waffle iron so it's preheating to full heat.
2) Measure 2 cups of all purpose flour in a large bowl (if possible sift the flour; however, it's not mandatory to do so. Just realize you may have a few more lumps in your batter, making it a little less smooth and having a bit rougher texture)
3) Add in 4 teaspoons of baking powder and a pinch of salt to the mix.
4) Mix the dry ingredients thoroughly to give a homogenous mixture.
5) Add in 1.5 cups of milk and mix until the mixture is smooth throughout.
6) If you're going to add flavors to your waffles, add the ingredients in now and mix.
Some of my favorites are:
A) Maple-almond: 1-2 teaspoons almond extract, 1/4 cup sliced almonds, 3-4 tablespoons maple syrup, 1/4 cup sugar (instead of almond abstract you can use a shot of amaretto instead)
B) Apple-cinnamon: 1/3 cup unsweetened apple sauce or finely chopped apple, 1 teaspoon cinnamon, 1/4 cup sugar (eliminate if using sweetened apple sauce), 1 teaspoon vanilla
C) Banana chocolate chip: 1-2 mashed bananas, 1/4-1/3 cup chocolate chips, 1/4 cup sugar, 1-2 teaspoons vanilla
D) Oregano-bacon: 0.5-1 tablespoon of oregano, 3-4 strips of bacon cut into pieces, pepper to taste (after being cooked place a little shredded cheddar cheese on top).
7) If you want softer all-round waffles, add in 5-6 tablespoons of veggie oil now and mix in.
Choose only one of 8A or 8B to do:
8A) I highly recommend you separate your eggs (it will make it very crispy on the outside and soft on the inside like at a high end restaurant, using a normal waffle iron or a Belgian waffle maker).
Take the yolks mix them into the flour and milk mixture (there is no need to beat the eggs before you mix them in).
Take the egg whites and beat them with an electric or hand mixer until soft peaks form in a medium bowl.
Once the egg whites are ready, using a spatula carefully fold in the beaten egg whites into the batter mixture.
Note: Use long, slow swoops to mix in the egg white. Use the minimum amount of stirs/swoops to fully stir in the whites. It should look like the picture below.

The batter fully mixed with egg whites
8B) If you choose not to separate the eggs for time and convenience, beat the eggs in a medium bowl and add to the add your eggs whole now to the mix and
9) The waffle iron should be fully heated now. Quickly spray a light coating of veggie oil, non-stick spray or quickly wipe some butter on a piece of paper towel (careful not to get burner) on the iron.
Note: You only have to do this once, even if you're doing multiple batches. If you have a good non-stick iron or like crispier waffles in the first place, you won't even need to do this step.
10) Add the batter to the iron and let cook.
Note: A good indication of when the waffle will be done is when it stops steaming profusely. If you can open the iron and the waffle comes free from the iron easily, it's done. If you notice resistance when opening the lid, just let the waffle cook a little bit more. To add to this, if you like it crispier, leave it a little longer cooking.
If you chose to add the 5-6 more tablespoons of oil, you'll want to take it off sooner-rather than later, otherwise there was no point in adding the oil. Personally, I like to leave out the oil entirely, and I'm still incredibly happy with final product.
11) Top with syrup, berries, or whatever you desire and serve hot.
When it comes to sweetness, feel free to add as much or as little sugar as you wish. I find I usually don't add any sugar at all and let the sweetness come from the berries, syrup, whip cream or whatever else I add to the top of it. To cut back on the syrup consumption, I've added some sugar to the recipes, but never go more than 1/3 cup for a full batch. I like sweet items, but find that anymore than 1/3 cup becomes too much when adding any sweet toppings.
This is great recipe that can have spices and tastes be altered as deemed fit. So release your inner chemist and experiment in the kitchen!
Enjoy!
The Canadian Cooking Chemist
Wednesday, 7 March 2012
Simple Potato Pancakes
Starting Note:
Sorry to those of you that read this earlier. I was way too ambitious on my first day of blogging and wrote this post far too late in the night, after a very long day. The text is now updated to have less spelling mistakes and have grammar that is a little more coherent!

Potato pancake with baked chicken and herbed vegetables, served with a spicy honey mustard and fresh dill dip.
Potato pancakes is a dish that is simple and extremely tasty. You can serve them on their own, or as part of a meal instead of mashed potatoes or a bed of rice. The recipe is very forgiving. So if you feel like experimenting with adding different spices to give different flavours, I highly recommend you try this recipe out!
What food stuff you will need for the potato pancakes:
1-2 potatoes per person (Yukon gold or red)- for 4 people, this is about 2 pounds
1 extra large egg (beaten), or one large egg with a dash a milk
1/3 teaspoon baking powder
1.5 teaspoons flour
~3/4 teaspoon salt
~1/2 teaspoon ground black pepper (fresh is best)
1 medium yellow or white onion
Dollop of butter, margarine or quick spray of olive oil
Optional: 1/4 cup cheddar cheese and/or 2-4 cloves of fresh garlic (or 1-2 teaspoons of garlic powder)
What "equipment" you will need for the potato pancakes:
1 coarse grater (a cheese grater will do)
1 large bowl
1 small bowl
1 fork or whisk
1 frying pan
1 large spatula
1 cookie sheet
Directions:
1) Set the oven at 350F and let preheat.
2) Wash the potatoes, and depending on your preference, peel the potatoes or leave them as is. (For simplicity I normally leave the skins on, and find minimal differences in taste and texture for the final product)
3) Using a grater, grate all the potatoes (they will look like shredded hashbrowns)
4) Remove the top layer of the onion and shred the onion just like the potatoes
Note: if an onion allergy to raw onion exists, substitute 2 tablespoons of onion power to recipe (if onion powder is ok) and add 1 more medium sized potato mixture. However, if no allergy exists, I find the addition of onion adds a nice sweetness from carmelization to the pancake.
5) Mix the shredded potato and onion together in a large bowl.
Optional: To make cheesy pancakes, shred ~1/4 cup of cheddar cheese and add to the shredded potato mixture now.
6) In a separate small bowl, scramble one extra large egg or 1 large egg with a dash of milk (be careful not to beat the egg too much or the pancakes will be a little tough. To be too tough will require at least 2-3 minutes of beating the egg by hand, so more than likely you'll be ok).
7) To the beaten egg, add 1/3 teaspoons of baking powder and 1.5 teaspoons of all purpose flour (white or whole wheat) to help stabilize/solidify the pancake while baking, and continue mixing until homogenous.
Note: the amount of flour can be increased if desired. More flour = firmer pancakes. However, I have found adding more than 3 teaspoons starts to make the pancake a bit "gritty".
8) To the beaten egg, add salt and pepper for taste. I find about 3/4 teaspoon of salt and 1/2 teaspoon of pepper does the trick for me, but feel free to add more or less to suit your pallet.
Optional: to the egg mixture you can can add fresh garlic if you wish. I like it full of garlic, so I add 4 cloves of minced fresh garlic. However, I find for the guests I serve, they typically prefer only 2 cloves of garlic. Feel free to add more or less garlic as you wish.
10) After mixing the egg mixture, add it to the shredded potato and onion mixture.
11) Thoroughly mix in the egg mixture to the shredded potato and onion mixture.
12) Heat a pan to a medium-high heat (you know it's ready since if you wet your finger tips and flick the water into the pan and the water sizzles and goes away in 1-2 seconds). If the pan is not hot enough, wait a minute and try the "water sizzle technique" again.
13) Make the potato/onion/egg mixture into 1/4-1/2 inch thick patties with about 3-4 inches diameter.
Note: This is very rough for size. For guidance, make the patties like you would for homemade hamburgers.
14) When the pan is hot enough, add a small cube of butter or margarine: for butter it's a little larger than a teaspoon, while for margarine it's about a tablespoon. (If you're more health conscious, evenly spray the pan, even if it's not stick, with some olive oil or non-stick spray such as Pam). Personally, I prefer a small dab of butter to all other options, but it is personal choice.
15) When the butter or margarine is fully melted or the oil is starting to smoke a bit, place the potato pancake patties in the pan
16) Wait about 3 minutes a side (until brown) and then flip.
**Resist the urge to flip prematurely. It will be tempting, but wait as long as possible and then flip the pancake to the other side and wait 3 min to give a nice crisp texture to the outside.
17) After you have cooked the pancakes on both sides to a brown colour (whatever deepness of brown you like), transfer them to a cooking sheet and place in the pre-heated oven at 350F for about 10 min.
18) After about 10 min, serve.
Note: If you'd like the pancakes to be a little more crispy, place them back in a frying pan on high for 1-2 minutes.
If you want to be a bit fancier, you can cut the pancakes using a circular cookie cutter or something as simplistic as a jar lid. This is how I got the circular shape in the picture above. It's a simple thing to do and gives a little bit of a "high end" appearance to an otherwise simplistic dish.
I like to serve the potato pancakes withe a little bit of sour creme, Greek Yogurt or homemade dill dip.
Enjoy!
The Canadian Cooking Chemist
Tuesday, 6 March 2012
The Start of the Cooking Chemist
I'm just a relatively normal guy that likes food. I'm pretty sure you'll be hard pressed to find a guy that doesn't like food. It also happens that I have my PhD in chemistry and am currently working in a laboratory doing chemical research everyday.
I believe that if you're a chemist, you have the potential to be a good chef/baker. (Well... if you're a good chemist you have more potential to be a good chef, while a poor chemist may have a bit more trouble). After all, at a rudimentary level, cooking and baking is just manipulating a complex set of chemicals to provide a source of nourishment. However, as boring and uninspired as that description is, there's no reason why cooking can't be fun, and the food tasty and, for the most part, healthy.
People spend A LOT of money on dining in restaurants or picking up their favorite snacks or treats everyday. After really thinking about it, I thought to myself, many items look complex or difficult to make, but I'm up to the challenge of making many of the dishes I see, and perhaps simplify the procedure or at least know exactly what is in the food.
I am not a professionally trained chef on any level. However, with some knowledge, a bit of guidance from time to time, and a lot of trial and error, I've started to experiment and come up with recipes that are relatively quick, but still provide enjoyment.
I will try to update on a fairly regular basis. I'll will try to post directions and instructions on everything from basic cooking products and strategies that I use all the way up to full multi-course meals. In my posts I will try to give tips and guidelines as best I can, with a picture of all the finished products. I'm new to this, so it may be a while for me to get the balance of enough pictures and information without being over or underwhelming. So with that said, I'll be open to comments on the blog and on the recipes on how they turned out for you!
Cheers,
The Canadian Cooking Chemist
PS. I have discovered there are other bogs that have been around for a while that are named "The Cooking Chemist", "Cookin' Chemist" and "Cooking Chemist". So to differentiate myself, the blog has been retitled The Canadian Cooking Chemist!
I believe that if you're a chemist, you have the potential to be a good chef/baker. (Well... if you're a good chemist you have more potential to be a good chef, while a poor chemist may have a bit more trouble). After all, at a rudimentary level, cooking and baking is just manipulating a complex set of chemicals to provide a source of nourishment. However, as boring and uninspired as that description is, there's no reason why cooking can't be fun, and the food tasty and, for the most part, healthy.
People spend A LOT of money on dining in restaurants or picking up their favorite snacks or treats everyday. After really thinking about it, I thought to myself, many items look complex or difficult to make, but I'm up to the challenge of making many of the dishes I see, and perhaps simplify the procedure or at least know exactly what is in the food.
I am not a professionally trained chef on any level. However, with some knowledge, a bit of guidance from time to time, and a lot of trial and error, I've started to experiment and come up with recipes that are relatively quick, but still provide enjoyment.
I will try to update on a fairly regular basis. I'll will try to post directions and instructions on everything from basic cooking products and strategies that I use all the way up to full multi-course meals. In my posts I will try to give tips and guidelines as best I can, with a picture of all the finished products. I'm new to this, so it may be a while for me to get the balance of enough pictures and information without being over or underwhelming. So with that said, I'll be open to comments on the blog and on the recipes on how they turned out for you!
Cheers,
The Canadian Cooking Chemist
PS. I have discovered there are other bogs that have been around for a while that are named "The Cooking Chemist", "Cookin' Chemist" and "Cooking Chemist". So to differentiate myself, the blog has been retitled The Canadian Cooking Chemist!
Subscribe to:
Posts (Atom)